

Baking: The Art of Turning Ingredients into Delightful Creations
Baking is more than just a culinary process; it’s an art form that has been passed down through generations. From the comforting aroma that fills the kitchen to the mouthwatering treats that emerge from the oven, baking has a magical way of bringing joy and satisfaction to both the baker and those lucky enough to savor their creations.
At its core, baking is a harmonious blend of science and creativity. It requires precision in measuring ingredients, understanding how they interact with one another, and mastering various techniques. Yet, within this framework lies endless room for imagination and innovation.
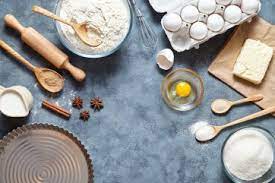
One of the most beautiful aspects of baking is its ability to transform simple ingredients into something extraordinary. Flour, sugar, eggs, butter—these humble components come together to create a symphony of flavors and textures that tantalize our taste buds. Whether it’s a flaky pie crust, a moist cake, or perfectly chewy cookies, each baked good tells its own unique story.
But baking is not just about the end result; it’s about the journey itself. The process can be therapeutic—a way to escape from the hustle and bustle of everyday life. Mixing ingredients by hand or with the help of modern appliances can be a meditative experience, allowing us to slow down and savor each step. And as we watch our creations rise in the oven, there’s an undeniable sense of anticipation and excitement.
Baking also fosters connections and creates cherished memories. Family recipes passed down from generation to generation carry with them stories of love and tradition. Baking together becomes an opportunity for bonding—sharing laughter, stories, and secrets while kneading dough or decorating cakes.
Moreover, baking encourages experimentation. It invites us to push boundaries by combining unexpected flavors or trying new techniques. With countless recipes available online or in cookbooks, there’s always room for exploration and discovery in the world of baking. And even if a recipe doesn’t turn out exactly as planned, there’s a valuable lesson learned and room for improvement in the next attempt.
In recent years, baking has experienced a resurgence in popularity. As people seek comfort and connection, they turn to the kitchen to create homemade treats that evoke nostalgia and warmth. The satisfaction of presenting a freshly baked loaf of bread or a batch of cookies to loved ones is unparalleled.
So, whether you’re an experienced baker or just starting your journey, embrace the art of baking. Let your creativity soar as you mix, knead, and decorate. Allow yourself to be transported by the scents and flavors that fill your home. And most importantly, share your creations with others—because baking is meant to be enjoyed together.
6 Essential Tips for Successful Baking
- Read through the recipe and make sure you have all the necessary ingredients before you start baking.
- Preheat your oven to the temperature specified in the recipe and check that it is accurate with an oven thermometer.
- Measure your ingredients accurately to ensure consistent results.
- Grease pans and use parchment paper where necessary to prevent sticking or burning of food items.
- Use a timer and check for doneness at regular intervals while baking, as oven temperatures can vary significantly from one oven to another.
- Allow baked goods to cool completely before serving or storing them away in an airtight container or freezer bag for later use.
Read through the recipe and make sure you have all the necessary ingredients before you start baking.
Baking Tip: Preparation is Key – Ensure You Have All the Ingredients
When it comes to baking, preparation is key. One of the most important steps before embarking on a baking adventure is to carefully read through the recipe and ensure you have all the necessary ingredients at hand. This simple tip can save you time, prevent frustration, and help guarantee a successful outcome for your baked goods.
Imagine this scenario: you’re in the middle of mixing your batter, only to realize that you’re missing a crucial ingredient. It can be disheartening and disrupt the flow of your baking process. That’s why taking a few minutes beforehand to double-check your pantry and gather all the required ingredients is essential.
By reading through the recipe in advance, you give yourself an opportunity to understand the steps involved and mentally prepare for each stage. This way, you can avoid any surprises or last-minute dashes to the grocery store.
Having all your ingredients ready not only streamlines the baking process but also ensures that your measurements are accurate. Baking is a science, and precise measurements are crucial for achieving consistent results. If you find yourself missing an ingredient or substituting it with something else on a whim, it may alter both the taste and texture of your final product.
Moreover, having everything prepared in advance allows you to enjoy the process more fully. Baking becomes a leisurely activity rather than a frantic search for missing items. You can focus on each step with ease and truly savor every moment spent creating something delicious.
Lastly, being prepared sets you up for success in case any unexpected challenges arise during baking. If you discover that an ingredient has gone bad or is running low, you have ample time to make alternative arrangements or adjust your recipe accordingly.
So, before preheating that oven and reaching for your mixing bowls, take a moment to read through your chosen recipe thoroughly. Check off each ingredient as you gather them from your pantry, ensuring that you have everything you need. By doing so, you’ll embark on your baking journey with confidence, knowing that you’re fully prepared to create something delightful.
Preheat your oven to the temperature specified in the recipe and check that it is accurate with an oven thermometer.
Preheating: The Secret to Baking Success
When it comes to baking, one crucial step often overlooked is preheating the oven. It may seem like a small detail, but it can make a world of difference in the outcome of your baked goods. Preheating ensures that your treats bake evenly, rise properly, and develop that irresistible golden crust. But how do you know if your oven is truly at the right temperature? That’s where an oven thermometer becomes your trusty ally.
The first rule of thumb in baking is to always preheat your oven to the temperature specified in the recipe. This allows the heat to distribute evenly throughout the oven cavity, creating a consistent environment for your baked goods. Skipping this step can result in uneven baking, leaving you with undercooked centers or overly browned edges.
However, relying solely on your oven’s built-in temperature display might not guarantee accuracy. Ovens can have hot spots or variations in temperature that can affect your baking results. That’s where an oven thermometer comes into play.
An oven thermometer is a simple tool that measures and displays the actual temperature inside your oven. By placing it on a rack while preheating, you can verify if your oven matches the desired temperature stated in the recipe. This extra step ensures precision and gives you peace of mind that you’re setting yourself up for baking success.
If you find that your oven runs hotter or cooler than indicated on its display, adjustments can be made accordingly. For example, if your oven runs hot by 25 degrees Fahrenheit (14 degrees Celsius), simply set it 25 degrees lower than what the recipe calls for. This way, you’ll achieve more accurate and consistent results with every bake.
Remember, baking is both an art and a science. Precision matters when it comes to measurements and temperatures. Taking the time to preheat properly and double-checking with an oven thermometer will elevate your baking game and help you achieve professional-quality results.
So, before you embark on your next baking adventure, don’t forget to preheat your oven to the specified temperature and verify its accuracy using an oven thermometer. With this simple tip, you’ll be well on your way to creating delectable treats that are evenly baked and sure to impress. Happy baking!
Measure your ingredients accurately to ensure consistent results.
In the world of baking, precision is key. One crucial tip that can make all the difference in your baked goods is to measure your ingredients accurately. While it may seem like a simple step, it plays a vital role in achieving consistent and delicious results every time you bake.
Accurate measurements ensure that the ratios of ingredients are just right, allowing the chemistry of baking to work its magic. Too much or too little of an ingredient can throw off the balance and affect the texture, taste, and overall outcome of your baked goods.
When measuring dry ingredients like flour, sugar, or cocoa powder, it’s important to use a proper measuring cup or spoon designed for dry ingredients. Spoon your ingredient into the measuring cup or spoon and level off the excess with a straight edge for precise measurements. Avoid packing down the ingredient as it can lead to incorrect amounts.
For liquids such as milk, water, or oil, use a liquid measuring cup with clear markings at eye level for accurate readings. Fill it to the appropriate line without tilting or guessing measurements.
When it comes to measuring sticky ingredients like honey or molasses, lightly coat your measuring spoon or cup with cooking spray or oil beforehand. This will help the sticky substance slide off easily and leave you with an accurate measurement.
Remember that baking is both an art and a science. Accurate measurements provide consistency in your recipes and ensure that each batch turns out as intended. Whether you’re making cookies, cakes, breads, or pastries, precision in measuring will help you achieve reliable results and avoid disappointing surprises.
So take a moment before you start mixing your ingredients together and pay attention to how you measure them. Your efforts will be rewarded with perfectly baked treats that are sure to impress family and friends alike. Happy baking!
Grease pans and use parchment paper where necessary to prevent sticking or burning of food items.
Baking Tip: Grease Pans and Use Parchment Paper for Perfectly Released Treats
When it comes to baking, there’s nothing more frustrating than having your carefully crafted creations stick to the pan or burn on the bottom. However, with a simple yet effective tip, you can ensure that your baked goods come out of the oven flawlessly every time. The secret? Greasing pans and using parchment paper where necessary.
Greasing your pans is an essential step in preventing sticking. Whether you’re making cookies, cakes, or bread, a well-greased pan creates a protective layer between the batter and the surface. This allows your baked goods to release easily without leaving behind any residue or losing their shape.
To grease a pan, start by choosing the right type of fat. Butter, shortening, or cooking spray are all excellent options. Use a pastry brush or your fingers to evenly coat the entire interior surface of the pan with a thin layer of grease. Pay extra attention to corners and edges where sticking is more likely to occur.
But what about those recipes that specifically call for parchment paper? Parchment paper is a baker’s best friend when it comes to preventing both sticking and burning. It acts as a non-stick barrier between your batter and the pan while also providing insulation against excessive heat.
To use parchment paper, cut it into a shape that fits snugly into your baking pan. Place it at the bottom before pouring in your batter or dough. The parchment paper not only prevents sticking but also makes it easier to lift out delicate items like cakes or bars without damaging them.
Using parchment paper also simplifies clean-up as it prevents any baked-on residue from clinging to the pan. It’s like having an extra insurance policy against any mishaps during baking.
So whether you’re making classic chocolate chip cookies or an elaborate layered cake, don’t underestimate the power of greasing pans and using parchment paper. These simple steps will save you time, frustration, and ensure that your baked goods turn out picture-perfect every time. With this baking tip in your arsenal, you can confidently embark on your culinary adventures and create treats that effortlessly slide out of the pan, ready to be enjoyed by all.
Use a timer and check for doneness at regular intervals while baking, as oven temperatures can vary significantly from one oven to another.
Baking Tip: Mastering Perfect Timing for Delightful Results
When it comes to baking, timing is everything. Achieving that ideal texture, golden crust, and moist interior requires precision and attention to detail. One essential tool that every baker should have in their arsenal is a trusty timer.
Why is a timer so crucial? Well, oven temperatures can vary significantly from one appliance to another. Even within the same oven, hot spots and inconsistencies can exist. This means that relying solely on the recommended baking time in a recipe may not always yield the desired outcome.
By using a timer and periodically checking for doneness at regular intervals during baking, you can ensure that your creations are perfectly cooked through. This simple yet effective technique allows you to adapt to your specific oven’s quirks and achieve consistent results every time.
Here’s how it works: Set your timer according to the recipe’s suggested baking time. As the minutes tick away, keep an eye on your baked goods through the oven door. At regular intervals, open the oven door slightly and perform tests to assess their doneness.
For cakes and quick breads, insert a toothpick or skewer into the center of the baked good. If it comes out clean or with just a few moist crumbs clinging to it, your treat is likely done. However, if there’s still wet batter sticking to the toothpick, give it a little more time in the oven before retesting.
When it comes to cookies or brownies, rely on visual cues rather than inserting a toothpick. Look for edges that are slightly golden brown and set while the centers remain soft but not overly gooey. Remember that these treats will continue cooking slightly as they cool on the baking sheet.
Using a timer and checking for doneness at regular intervals helps you avoid overbaking or underbaking your creations. It allows you to make necessary adjustments based on your unique oven’s behavior, ensuring that your baked goods come out perfectly moist, tender, and delicious.
So, the next time you embark on a baking adventure, don’t forget to arm yourself with a timer. Embrace the art of precision and pay close attention to your treats as they transform in the oven. With this simple tip, you’ll become a master of timing, and your baked creations will consistently impress with their delightful results.
Allow baked goods to cool completely before serving or storing them away in an airtight container or freezer bag for later use.
The Importance of Patience: Allowing Baked Goods to Cool Completely
One of the most challenging aspects of baking is resisting the temptation to indulge in freshly baked goodies right away. The heavenly aroma that fills the kitchen and the anticipation of sinking your teeth into a warm treat can make it difficult to exercise patience. However, there is one crucial tip that should never be overlooked: allowing baked goods to cool completely before serving or storing them away.
Why is this step so important? Well, it all comes down to texture and flavor. When baked goods come out of the oven, they are still undergoing internal changes. The residual heat continues to cook them from within, and if you cut into them too soon, you risk altering their texture and moisture content.
Allowing your creations to cool properly ensures that they maintain their desired consistency. Cakes will set properly, cookies will achieve that perfect chewiness or crispness, and breads will develop their ideal crumb structure. Cooling also allows flavors to meld together and develop fully, resulting in a more harmonious taste.
Moreover, cooling prevents delicate treats from falling apart or becoming misshapen. For example, attempting to frost a cake while it’s still warm can lead to a messy disaster as the frosting melts and slides off. Similarly, removing cookies from the baking sheet too soon may cause them to break apart or lose their shape entirely.
But how long should you wait? While it varies depending on the recipe and size of the baked goods, a general rule of thumb is to allow them to cool for at least 15-30 minutes on a wire rack. Larger items like cakes may require more time—upwards of an hour—before they are ready for frosting or slicing.
Once your treats have cooled completely, it’s essential to store them properly for future enjoyment. Transfer them into an airtight container or freezer bag to maintain freshness and prevent staleness. This step is particularly crucial for items like cookies and pastries, which can lose their desired texture if exposed to air for too long.
So, as difficult as it may be to resist diving into that warm, fragrant creation straight from the oven, exercise patience and allow your baked goods to cool completely. Your taste buds will thank you for the improved texture and flavor. And when you do indulge, savor each bite knowing that your patience has paid off in creating a truly delightful treat.