

Cake: A Timeless Delight for Every Occasion
When it comes to celebrating life’s special moments, there is one sweet treat that has stood the test of time: cake. Whether it’s a birthday, wedding, anniversary, or any other joyous occasion, cake has become a symbol of indulgence and celebration.
The history of cake dates back centuries, with its origins traced to ancient Egypt and Greece. From humble beginnings as simple bread-like creations sweetened with honey, cakes have evolved into an art form that tantalizes our taste buds and captivates our senses.
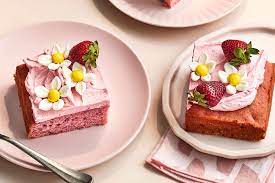
One of the reasons why cake holds such a special place in our hearts is its versatility. From classic flavors like chocolate and vanilla to more adventurous combinations like red velvet or salted caramel, there is a cake for every palate. The soft and moist texture paired with delectable frostings or fillings creates a harmonious symphony of flavors that leaves us craving for more.
But cakes are not just about taste; they are also about aesthetics. The artistry involved in designing and decorating cakes has reached new heights. Intricate piping techniques, fondant sculpting, and edible embellishments have transformed cakes into edible works of art. From elegant tiered wedding cakes adorned with delicate sugar flowers to whimsical character-themed birthday cakes that bring smiles to children’s faces, each creation is a testament to the skill and creativity of pastry chefs around the world.
Moreover, cake has the power to evoke nostalgia and create lasting memories. It is often associated with childhood birthdays or family gatherings where loved ones come together to share laughter and joy. The act of blowing out candles atop a beautifully decorated cake while making a wish has become a cherished tradition that transcends cultures and generations.
In recent years, there has been an explosion of specialty bakeries catering to various dietary needs and preferences. Gluten-free, vegan, and allergen-friendly options have made it possible for everyone to indulge in the pleasure of cake, regardless of dietary restrictions.
Cake has also become a popular form of self-expression. Customized cakes that reflect personal interests, hobbies, or favorite characters have become a way to celebrate individuality and showcase creativity. From sports-themed cakes for avid athletes to book-shaped cakes for passionate readers, the possibilities are endless.
In conclusion, cake is not merely a dessert; it is an experience that brings people together and adds sweetness to life’s milestones. Its ability to delight our taste buds, ignite our imagination, and create lasting memories is what makes it an enduring symbol of celebration. So, the next time you have something worth celebrating, remember that cake is more than just a confection—it’s a timeless delight that brings joy and happiness to all who partake in its deliciousness.
7 Essential Tips for Baking Perfect Cakes
- Always use fresh ingredients when baking a cake.
- Preheat the oven to the temperature specified in your recipe.
- Grease and flour your cake pans before adding the batter.
- Check for doneness by inserting a toothpick into the center of the cake – it should come out clean when done baking.
- Let cakes cool completely before frosting or decorating them, as this will help prevent them from crumbling apart when you cut into them later on.
- Use an offset spatula to evenly spread frosting onto cakes for a professional look and finish.
- Store any leftover cake in an airtight container at room temperature or in the refrigerator for up to 3 days, depending on what type of cake it is (fruit-based ones should be refrigerated).
Always use fresh ingredients when baking a cake.
The secret to baking a perfect cake lies in one simple tip: always use fresh ingredients. While it may seem like a small detail, the quality of your ingredients can make a significant difference in the final result.
Fresh ingredients, such as eggs, butter, flour, and baking powder, are essential for achieving the light and fluffy texture that we all crave in a cake. When these ingredients are past their prime or have been sitting in your pantry for too long, their effectiveness may diminish. Stale baking powder may fail to give your cake the desired rise, while expired eggs or butter could affect its taste and overall structure.
Using fresh ingredients not only ensures optimal flavor but also enhances the overall quality of your cake. Fresh eggs add richness and moisture, while fresh butter lends a creamy texture and enhances the richness of the batter. Similarly, fresh flour and leavening agents contribute to a tender crumb and help the cake rise properly.
Another advantage of using fresh ingredients is that they are more likely to blend well together during mixing. This results in a smoother batter that bakes evenly, ensuring consistent texture throughout the cake.
To guarantee freshness, it’s advisable to purchase your ingredients from reputable sources and check their expiration dates before use. Additionally, storing perishable items like eggs and butter properly can help maintain their freshness for longer periods.
Remember that when you bake a cake, you’re creating something special to be enjoyed by yourself and others. By using fresh ingredients, you’re taking an extra step towards ensuring that your creation is of the highest quality possible—a cake that is not only visually appealing but also tastes divine.
So next time you embark on a baking adventure, don’t overlook this crucial tip: always opt for fresh ingredients. Your taste buds—and those of anyone lucky enough to enjoy your delectable creation—will thank you!
Preheat the oven to the temperature specified in your recipe.
Preheat the Oven: The Secret to Baking Perfect Cakes
When it comes to baking a delicious and perfectly cooked cake, one simple tip can make all the difference: preheating the oven. It may seem like a small step, but it plays a crucial role in achieving that light and fluffy texture we all crave.
Preheating the oven is essential because it ensures that the cake batter starts cooking at the right temperature from the very beginning. When you place your cake in a preheated oven, the heat surrounds it evenly, allowing for consistent baking throughout.
By following this step, you create an ideal environment for your cake to rise properly. The initial burst of heat activates the leavening agents like baking powder or baking soda, causing air bubbles to form and expand within the batter. This process leads to a light and airy texture that is characteristic of well-baked cakes.
Moreover, preheating helps set the structure of your cake early on. The high temperature causes rapid expansion of air pockets within the batter while simultaneously solidifying the outer layer. This quick setting prevents excessive spreading or collapsing during baking, resulting in a beautifully risen cake with a tender crumb.
Another benefit of preheating is that it reduces overall baking time. When you place your cake into an already hot oven, it can start cooking immediately without any delay. This means less time spent in the oven and reduced risk of over-baking or drying out your creation.
To ensure success, always refer to your recipe for specific temperature guidelines. Different cakes may require different temperatures depending on their ingredients and size. By following these instructions and preheating your oven accordingly, you set yourself up for baking triumph.
So next time you embark on a cake-baking adventure, don’t overlook this vital step—preheat your oven! It’s a simple yet effective technique that guarantees even baking, proper rising, and ultimately results in a scrumptious cake that will impress your family and friends. Happy baking!
Grease and flour your cake pans before adding the batter.
Baking a cake is a delightful endeavor that brings joy and deliciousness to any occasion. To ensure that your cake comes out of the pan smoothly and beautifully, there is a simple yet essential tip: grease and flour your cake pans before adding the batter.
Greasing the pan creates a non-stick surface, allowing the cake to release easily after baking. This step prevents the cake from sticking to the sides or bottom of the pan, which can lead to an unattractive appearance or even cause it to break apart when removing it.
To grease your cake pans, start by selecting a cooking oil or melted butter. Using a pastry brush or paper towel, spread a thin layer of grease on the entire interior surface of the pan, including the sides and corners. Be sure to reach every nook and cranny for optimal results.
After greasing, dusting the pan with flour adds an additional layer of insurance against sticking. The flour adheres to the greased surface, creating a barrier between the batter and the pan. This helps absorb any excess moisture from the batter, further preventing sticking.
To flour your pans, add a small amount of all-purpose flour to each greased pan. Tilt and rotate each pan until its interior is evenly coated with flour. Tap out any excess flour over a sink or garbage bin.
By greasing and flouring your cake pans before adding batter, you set yourself up for success in achieving perfectly baked cakes that effortlessly slide out of their molds. The result? A flawless presentation that will impress both your eyes and taste buds.
Remember, this simple step should not be overlooked when preparing your favorite cakes. It takes just a few extra minutes but ensures that your baking experience is stress-free and yields beautiful results every time.
So next time you’re ready to embark on a baking adventure, don’t forget this valuable tip: grease and flour your cake pans before adding the batter. Your cakes will thank you with their effortless release and picture-perfect appearance. Happy baking!
Check for doneness by inserting a toothpick into the center of the cake – it should come out clean when done baking.
Baking the perfect cake can sometimes feel like a delicate balancing act. The right ingredients, precise measurements, and proper technique all play a role in achieving that moist and fluffy texture we crave. But how can you be sure your cake is fully baked without risking overcooking it? That’s where a simple tip comes in handy: check for doneness by inserting a toothpick into the center of the cake.
This tried-and-true method has been passed down through generations of bakers, and for good reason. It’s a reliable way to determine if your cake is ready to be taken out of the oven. Here’s how it works: once your cake has been baking for the recommended time, carefully insert a toothpick into the center of the cake. If it comes out clean or with just a few crumbs clinging to it, your cake is done.
Why does this method work so well? When the batter is still raw, it contains moisture that will cling to the toothpick, resulting in a sticky or wet appearance when removed. However, as the cake bakes and sets, that moisture evaporates, leaving behind only dry crumbs or a clean toothpick.
It’s important to note that different types of cakes may have varying baking times due to their ingredients or size. So always refer to your recipe for specific instructions on baking times and temperatures. Additionally, keep in mind that ovens can vary in temperature accuracy, so it’s advisable to use an oven thermometer for more precise results.
While this toothpick test is an excellent indicator of doneness, it doesn’t hurt to rely on other visual cues as well. Look for golden edges pulling away from the sides of the pan or a springy touch when gently pressed in the center. These signs can further confirm that your cake is perfectly baked.
So next time you find yourself in front of an oven with anticipation building up as your cake bakes away, remember this handy tip. By inserting a toothpick into the center and ensuring it comes out clean, you can confidently declare your cake ready to be enjoyed. With this simple technique, you’ll be able to achieve that ideal texture and savor every delightful bite of your homemade masterpiece.
Let cakes cool completely before frosting or decorating them, as this will help prevent them from crumbling apart when you cut into them later on.
A Crucial Tip for Perfect Cakes: Let Them Cool Completely
Baking a cake is an art that requires patience, precision, and a touch of love. While the process of mixing ingredients and watching the batter transform into a golden masterpiece is exciting, it’s essential to exercise restraint when it comes to frosting and decorating. One crucial tip that can make all the difference in the final result is to let your cakes cool completely before adding any finishing touches.
Why is this step so important? Well, when you take your cake out of the oven, it’s still undergoing some internal changes. The residual heat continues to cook the cake from within, allowing it to set and develop its structure fully. If you rush into frosting or decorating too soon, you risk encountering a crumbly mess when you cut into your creation later on.
By allowing your cakes to cool completely, you give them time to firm up and stabilize. This process ensures that the delicate crumb structure has time to settle and solidify, resulting in a more cohesive texture that holds together beautifully when sliced or served.
Additionally, frosting or decorating a warm cake can lead to another issue—melting. Imagine carefully spreading a luscious layer of buttercream onto a still-warm cake only for it to melt and slide off due to the residual heat. All your hard work would go down the drain! So, exercise patience and wait until your cakes have cooled down completely before applying any frostings or decorations.
To ensure proper cooling, remove your cakes from their pans once they are out of the oven. Place them on wire racks or heat-resistant surfaces where air can circulate freely around them. This allows heat to dissipate evenly from all sides of the cake, promoting faster cooling while preventing condensation from forming on the bottom.
The cooling process may take some time depending on factors such as cake size and thickness. It’s worth the wait! Take this opportunity to clean up your workspace, prepare your frosting or decorations, or simply enjoy the tantalizing aroma that fills your kitchen.
Remember, patience is a virtue in the world of cake baking. Allowing your cakes to cool completely before frosting or decorating them ensures a more structurally sound and visually appealing final product. So, take a deep breath, resist the temptation to rush ahead, and let your cakes cool to perfection. The end result will be a slice of pure delight that not only tastes amazing but also holds its shape flawlessly.
Use an offset spatula to evenly spread frosting onto cakes for a professional look and finish.
Achieve a Professional Finish with an Offset Spatula: The Secret to Perfectly Frosted Cakes
When it comes to creating a beautifully frosted cake, one tool can make all the difference: the offset spatula. This simple yet versatile kitchen utensil is the secret weapon that professional bakers use to achieve a flawless finish.
The offset spatula, with its long, narrow blade and angled design, allows for precise control and smooth application of frosting. Unlike a regular butter knife or straight spatula, the offset spatula’s unique shape keeps your hand away from the cake’s surface, preventing accidental smudges or uneven spread.
To use an offset spatula effectively, start by applying a generous amount of frosting to the top of your cake. Hold the handle of the spatula firmly and gently glide it across the surface in long, smooth strokes. The angled blade helps create an even layer of frosting without disturbing the cake’s crumb structure.
As you work your way around the sides of the cake, continue using smooth motions to spread the frosting evenly. The offset spatula’s flexibility allows you to easily maneuver around curves and edges, ensuring every inch of your cake receives an equal amount of creamy goodness.
Not only does an offset spatula help achieve a professional look, but it also saves time and minimizes frustration. With its precise application and smooth gliding action, you’ll spend less time fixing mistakes or trying to create straight lines with other tools.
Furthermore, an offset spatula is not limited to frosting cakes alone. Its versatility extends to smoothing ganache on brownies, spreading batter in baking pans evenly, or even lifting delicate cookies off baking sheets without causing breakage.
Investing in a good-quality offset spatula is a game-changer for any aspiring baker or home cook. It elevates your creations from homemade treats to bakery-worthy delights that impress friends and family alike.
So next time you’re preparing to frost a cake, don’t underestimate the power of an offset spatula. With its precision and ease of use, you’ll transform your cakes into picture-perfect masterpieces that taste as good as they look. Embrace this small but mighty tool, and watch your baking skills soar to new heights.
Store any leftover cake in an airtight container at room temperature or in the refrigerator for up to 3 days, depending on what type of cake it is (fruit-based ones should be refrigerated).
Preserving the Deliciousness: Storing Leftover Cake
We’ve all been there—after a delightful celebration, there’s leftover cake that we can’t bear to waste. But how do we ensure that the cake stays fresh and delicious for as long as possible? The key lies in proper storage.
When it comes to storing leftover cake, one important factor to consider is the type of cake you have. Fruit-based cakes, such as those with fresh berries or cream fillings, are more perishable and should be refrigerated promptly. The cool temperature helps maintain their freshness and prevents spoilage. Simply place these delectable creations in an airtight container and pop them into the refrigerator.
For other types of cakes, like classic chocolate or vanilla, storing at room temperature is usually sufficient. However, it’s essential to keep them in an airtight container to prevent moisture loss and maintain their moistness. This will also help retain their flavor and texture over time.
If you choose to store your cake at room temperature, find a cool spot away from direct sunlight or heat sources. Placing it on the kitchen counter or in a pantry is ideal. Remember to seal the container tightly after each use to preserve its freshness.
When it comes to duration, most cakes can be stored for up to three days without compromising their taste or quality. However, it’s always best to use your judgment and rely on your senses. If you notice any signs of spoilage like mold growth or an off smell, it’s better to err on the side of caution and discard the cake.
To extend the shelf life of your leftover cake beyond three days, freezing is an excellent option. Slice the cake into individual portions and wrap each piece tightly in plastic wrap before placing them in a freezer-safe bag or container. When you’re ready for another slice of heaven, simply thaw it at room temperature for a few hours or overnight in the refrigerator.
By following these simple guidelines, you can savor the delight of your leftover cake for a few extra days. Whether you prefer refrigeration or room temperature storage, the key is to maintain an airtight environment and be mindful of the cake’s ingredients. So, enjoy your cake to the fullest and make every slice count!