

Indulging in the Delight of Fine Baked Goods
There’s something truly magical about the aroma of freshly baked goods wafting through the air. The tantalizing scent beckons us to take a momentary pause, to savor the pleasure that lies within each delectable bite. Fine baked goods are more than just food; they are an experience that transports us to a world of taste and texture.
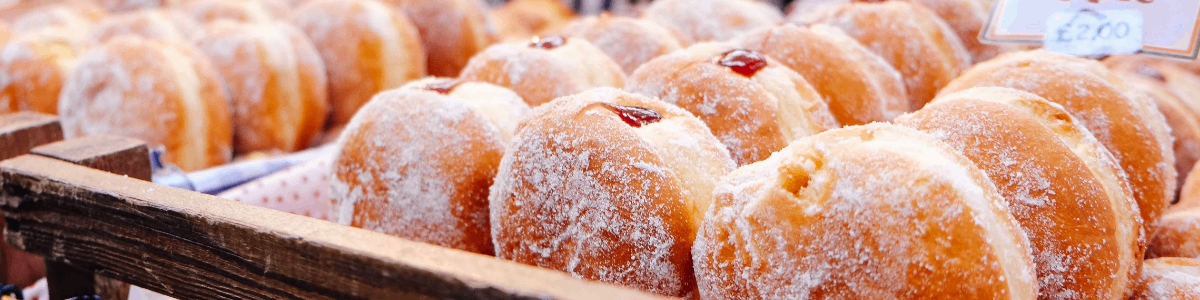
At first glance, a display of fine baked goods is a feast for the eyes. Each pastry, cake, or loaf is a work of art, meticulously crafted with precision and passion. From delicate pastries adorned with intricate designs to rustic breads with their golden crusts, these creations are as visually stunning as they are delicious.
But it is when we take that first bite that we truly understand the magic. The outer layer may be crisp or tender, depending on the pastry, but it always gives way to a soft and flavorful interior. Whether it’s the buttery flakiness of a croissant or the moist crumb of a freshly baked cake, each bite offers an explosion of taste that delights our senses.
Fine baked goods come in countless varieties, catering to every palate and preference. From classic favorites like chocolate chip cookies and apple pies to more adventurous creations like matcha-infused pastries and lavender-infused cakes, there is something for everyone. These treats can be enjoyed any time of day – a buttery croissant for breakfast, a delicate éclair for afternoon tea, or a rich slice of cake for dessert.
What sets fine baked goods apart is not only their exquisite taste but also the care and expertise put into their creation. Master bakers and pastry chefs dedicate years honing their skills, perfecting techniques passed down through generations. They understand the science behind baking – from precise measurements to temperature control – ensuring that each batch comes out flawlessly.
The quality of ingredients used in fine baked goods is paramount. From the finest butter and eggs to the freshest fruits and nuts, every element plays a crucial role in achieving the perfect balance of flavors. Artisanal bakers often source locally, supporting their communities and ensuring the highest quality ingredients go into their creations.
Whether enjoyed alone or shared with loved ones, fine baked goods have a way of bringing people together. They evoke feelings of comfort, nostalgia, and celebration. They are an expression of love and care, as bakers pour their hearts into every creation they make.
So, next time you encounter a bakery showcasing an array of fine baked goods, take a moment to appreciate the craftsmanship behind each treat. Allow yourself to be transported by the heavenly scents and flavors that await you. Indulge in the delight that comes from savoring these exquisite creations – for in each bite lies a world of joy and satisfaction.
6 Frequently Asked Questions About Fine Baked Goods: Tips for Perfecting Your Recipes
- What are the best recipes for fine baked goods?
- What ingredients should I use to make the perfect cake?
- How can I make sure my pastries come out light and fluffy?
- How can I get a glossy finish on my pies and tarts?
- What tips do you have for baking breads with a crispy crust?
- How can I make sure my cookies don’t spread too much when baking them?
What are the best recipes for fine baked goods?
When it comes to fine baked goods, there are countless recipes that can elevate your baking skills and delight your taste buds. Here are a few classic and popular recipes to get you started on your journey of creating exceptional baked treats:
- Classic Croissants: Master the art of laminated dough with this recipe for buttery, flaky croissants. The process may be time-consuming, but the results are well worth it.
- French Macarons: These delicate almond meringue cookies with a smooth ganache or buttercream filling are not only visually stunning but also incredibly delicious. Experiment with different flavors and colors to create a variety of macarons.
- Tiramisu: This Italian dessert layers ladyfingers soaked in coffee and rum with a rich mascarpone cream, creating an indulgent treat that is both creamy and satisfying.
- Lemon Bars: Tangy and sweet, lemon bars offer a refreshing burst of flavor. A buttery shortbread crust topped with a zesty lemon filling makes these bars irresistible.
- Chocolate Soufflé: Impress your guests with this classic French dessert known for its airy texture and rich chocolate flavor. A perfectly risen soufflé is a true testament to your baking skills.
- Cinnamon Rolls: Soft, gooey cinnamon rolls topped with cream cheese frosting are the epitome of comfort food. The aroma alone will make everyone eagerly gather around the kitchen.
- Apple Pie: A timeless favorite, apple pie features a flaky crust filled with juicy apples infused with warm spices like cinnamon and nutmeg. Serve it warm with a scoop of vanilla ice cream for the ultimate treat.
- Red Velvet Cupcakes: These vibrant cupcakes with their velvety texture and rich cocoa flavor are sure to impress at any gathering or celebration.
- Pain au Chocolat: Similar to croissants but filled with decadent chocolate batons, pain au chocolat is a delightful French pastry that combines buttery layers with sweet indulgence.
- Cheesecake: Creamy, smooth, and rich, cheesecake is a dessert that never fails to please. From classic New York-style to fruity variations like strawberry or raspberry swirl, there’s a cheesecake for every taste.
Remember, the key to achieving fine baked goods lies in precision and attention to detail. Follow recipes closely, use high-quality ingredients, and don’t be afraid to experiment and add your own personal touch. With practice and patience, you’ll soon be creating baked treats that are truly exceptional.
What ingredients should I use to make the perfect cake?
To create the perfect cake, you’ll need a combination of essential ingredients that work together harmoniously. Here are the key ingredients to consider:
- Flour: All-purpose flour is commonly used for cakes, providing structure and texture. Cake flour, with its lower protein content, can result in a lighter and more tender crumb.
- Sugar: Granulated sugar adds sweetness and moisture to the cake. The amount of sugar can be adjusted based on personal preference and the flavor profile you desire.
- Fat: Butter is a popular choice for its rich flavor, but you can also use vegetable oil or a combination of both. Fat contributes to the cake’s tenderness and moisture.
- Eggs: Eggs act as binders and add structure to the cake. They also contribute moisture and richness. Large eggs are typically used in most recipes.
- Leavening agents: Baking powder and/or baking soda are essential for creating a light, fluffy texture by causing the cake to rise during baking.
- Liquid: Milk or buttermilk is often added to provide moisture and enhance tenderness in the cake batter.
- Flavorings: Vanilla extract is a common flavoring used in cakes, imparting a pleasant aroma and taste. Other extracts like almond or citrus can be used for different flavor profiles.
- Salt: A small amount of salt enhances flavors and balances sweetness in the cake.
It’s important to note that specific recipes may call for additional ingredients such as cocoa powder, chocolate chips, fruits, nuts, or spices depending on the desired flavor variation.
Remember that precise measurements, proper mixing techniques, and accurate baking times are equally crucial factors in achieving a perfect cake outcome. Have fun experimenting with different flavors while keeping these essential ingredients in mind!
How can I make sure my pastries come out light and fluffy?
Achieving light and fluffy pastries requires attention to detail and a few key techniques. Here are some tips to help you create the perfect airy texture in your baked goods:
- Quality Ingredients: Start with high-quality ingredients. Fresh eggs, good quality butter, and fresh leavening agents like baking powder or yeast can make a significant difference in the final result.
- Proper Mixing: When mixing your dough or batter, avoid overmixing. Overmixing can develop gluten, resulting in a dense and tough texture. Mix until the ingredients are just combined, ensuring a light touch.
- Leavening Agents: Use the appropriate amount of leavening agents such as baking powder or yeast as specified in the recipe. These ingredients help create air pockets that contribute to the lightness of your pastries.
- Sifting Dry Ingredients: Sift your dry ingredients such as flour, baking powder, and salt before incorporating them into your batter. This helps to remove any lumps and aerates the mixture for better incorporation of air.
- Incorporating Air: Incorporate air into your batter by using techniques like creaming butter and sugar together until light and fluffy or beating egg whites separately until stiff peaks form before folding them into the batter.
- Proper Oven Temperature: Preheat your oven to the correct temperature specified in the recipe and ensure it remains consistent throughout the baking process. The right temperature allows for proper rising without over-browning or drying out the pastries.
- Timing: Pay attention to baking time as specified in the recipe. Overbaking can result in dry pastries, while underbaking can leave them raw inside.
- Cooling Properly: Allow your pastries to cool completely on a wire rack after removing them from the oven. This helps retain their structure and prevents condensation from making them soggy.
- Practice Patience: Avoid opening the oven door frequently while baking, as this can cause temperature fluctuations and affect the rising process. Trust the recipe and let your pastries bake undisturbed.
Remember, achieving light and fluffy pastries may require some practice. Don’t be discouraged if your first attempts aren’t perfect. With time, patience, and attention to detail, you’ll be able to create delightful treats that are light as a cloud.
How can I get a glossy finish on my pies and tarts?
Achieving a glossy finish on your pies and tarts can elevate their appearance and make them even more enticing. Here are a few tips to help you achieve that desired glossy sheen:
- Egg Wash: One of the most common methods is to apply an egg wash before baking. Beat an egg with a tablespoon of water or milk, and then brush it lightly over the surface of the pastry. This will create a golden, shiny finish as it bakes.
- Sugar Syrup Glaze: For fruit pies and tarts, consider brushing them with a sugar syrup glaze after baking. Simply heat equal parts water and granulated sugar in a saucepan until the sugar dissolves completely. Allow the syrup to cool slightly, then brush it over the fruit or glaze the entire surface for a shiny appearance.
- Milk or Cream Wash: Another option is to brush the pastry with milk or cream before baking. This will help create a golden sheen on the crust while giving it a glossy appearance.
- Gelatin Glaze: To achieve an extra glossy finish, you can prepare a gelatin glaze by dissolving unflavored gelatin in warm water according to package instructions. Once dissolved, gently brush the glaze over your baked pie or tart using a pastry brush.
- Fruit Jams or Jellies: If you’re looking for both flavor and shine, try brushing warmed fruit jams or jellies over your pies or tarts while they are still warm from the oven. The heat will help melt and spread them evenly, creating an attractive glazed finish.
Remember that timing is crucial when applying any of these methods. Apply your chosen glaze just before baking (for egg wash) or immediately after removing from the oven (for other options). This way, you’ll ensure that your pies and tarts have that beautiful glossy finish without compromising their texture or taste.
Experiment with these techniques and find the one that works best for your specific recipe. With a little extra effort, you’ll be able to present your pies and tarts with a stunning, professional-looking finish that will impress everyone who lays eyes on them.
What tips do you have for baking breads with a crispy crust?
Achieving a perfectly crispy crust on homemade bread can elevate the entire baking experience. Here are some tips to help you achieve that desired crunch:
- Use the right flour: Opt for bread flour or all-purpose flour with a high protein content. These flours have more gluten, which contributes to a chewy texture and helps create a crispy crust.
- Preheat your oven and use steam: Preheating your oven is essential for creating that initial burst of heat necessary for crust formation. Additionally, introducing steam in the oven during the first few minutes of baking helps create moisture, which aids in crust development. You can achieve this by placing a pan of hot water in the bottom of the oven or using a spray bottle to mist water into the oven.
- Baking stone or steel: Using a baking stone or steel can help distribute heat evenly and create a crispier crust. Place it on the middle rack of your oven and preheat it along with the oven.
- Slash or score your dough: Before baking, make shallow cuts on top of your dough using a sharp knife or razor blade. This allows steam to escape during baking, preventing an overly thick and doughy crust.
- Create steam within your bread: To enhance crust crispiness further, you can add moisture directly to your dough by placing an oven-safe dish filled with water beneath the bread while it bakes.
- Bake at high temperatures: Start by preheating your oven to around 450-500°F (230-260°C). The high temperature helps set the crust quickly, leading to better browning and crispiness.
- Don’t rush cooling: Once baked, allow your bread to cool completely on a wire rack before slicing into it. This allows any remaining moisture to evaporate and ensures that you maintain that desired crispy exterior.
Remember, achieving the perfect crispy crust may require some experimentation based on your specific recipe, oven, and personal preference. So don’t be afraid to try different techniques and adjust accordingly until you find the ideal balance of crustiness that suits your taste.
How can I make sure my cookies don’t spread too much when baking them?
Achieving perfectly shaped cookies can be a challenge, but with a few helpful tips, you can prevent excessive spreading and enjoy beautifully baked treats. Here are some suggestions to ensure your cookies maintain their shape:
- Chilled dough: Before baking, refrigerate your cookie dough for at least 30 minutes or even overnight. Chilled dough spreads less during baking because the fat in the dough solidifies, allowing the cookies to hold their shape better.
- Proper butter consistency: Ensure that your butter is at the correct consistency when making your cookie dough. It should be softened but still cool to the touch. If the butter is too soft or melted, it can lead to excessive spreading.
- Use a mix of fats: Rather than using only butter, consider using a combination of butter and shortening or margarine in your recipe. Shortening has a higher melting point than butter, which helps control spreading.
- Adjust flour quantity: If you find that your cookies consistently spread too much, try increasing the amount of flour slightly in your recipe. This helps absorb excess moisture and reduces spreading.
- Use low-protein flour: Flour with lower protein content (like cake flour) produces softer and less spread-out cookies compared to high-protein flours (like bread flour). Consider using all-purpose flour or experimenting with different types of flour to find what works best for you.
- Avoid over-mixing: Over-mixing can lead to more gluten development in the dough, resulting in cookies that spread excessively. Mix until just combined once you add the dry ingredients to prevent this from happening.
- Baking temperature and time: Ensure that your oven is preheated accurately to the specified temperature in the recipe. Higher temperatures can cause cookies to spread more quickly before they set properly. Also, avoid overbaking as it can cause additional spreading.
- Use parchment paper or silicone baking mats: These non-stick liners can help insulate the bottom of the cookies, reducing excessive spreading. They also make it easier to remove the cookies from the baking sheet without sticking.
By implementing these tips and making small adjustments to your recipe and baking process, you can minimize cookie spreading and achieve beautifully shaped treats that taste as good as they look. Happy baking!